In This Article
- Why New Construction Changes Everything
- The Incremental Cost Advantage
- Planning Timeline: When to Make Each Decision
- Loop Field Planning During Site Work
- Ductwork and Distribution Design
- Working With Your Builder and HVAC Contractor
- Real Cost Examples: New Build vs. Retrofit
- Financing and Incentives for New Builds
- Common Mistakes That Cost Thousands
- Frequently Asked Questions
Here's something that frustrates every geothermal installer in the country: the best time to install a geothermal system is before the house exists. And yet, the overwhelming majority of homeowners don't learn about geothermal until they're replacing a 20-year-old furnace in an existing home — when costs are highest and installation is most disruptive.
If you're building a new home, you have an opportunity that retrofit customers would kill for. The excavation equipment is already on site. The yard hasn't been landscaped. The ductwork hasn't been installed. The HVAC budget hasn't been spent on a conventional system you'll rip out in 15 years.
This guide covers everything you need to know to get geothermal right in new construction — from the planning timeline to builder coordination to the financial math that makes new-build geothermal one of the smartest investments in residential construction.
Why New Construction Changes Everything
When people research geothermal costs online, the numbers they usually find — $18,000 to $45,000+ — are retrofit costs. That means digging up an existing yard, working around established landscaping, and replacing a functioning HVAC system that still has value.
New construction eliminates most of those cost drivers:
The Five Cost Advantages of New Construction
- Excavation equipment is already on site. The backhoe digging your foundation can dig your loop trenches for a fraction of the cost of mobilizing equipment separately.
- No landscape restoration. In a retrofit, you're tearing up a finished yard — mature trees, gardens, driveways — and paying to put it all back. In new construction, the yard is bare dirt.
- No existing system to remove. You're not paying for a conventional furnace/AC plus a geothermal system. You're choosing one or the other. The comparison is incremental cost — how much more than the conventional system you'd have installed anyway.
- Ductwork designed for geothermal from day one. Geothermal heat pumps deliver air at 90–105°F (vs. 120–140°F from a furnace), so ducts should be slightly larger. Designing them right from the start costs almost nothing extra. Retrofitting ductwork later? That's a different story.
- Loop field integrated with site plan. Your builder can route utility trenches, plan drainage, and position the loop field during site work — all at marginal cost.
The bottom line: where a geothermal retrofit might cost $25,000–$45,000 after incentives, the incremental cost over a conventional HVAC system in new construction is typically $8,000–$15,000 after the 30% federal tax credit. That's the real number to evaluate.
The Incremental Cost Advantage
The concept of "incremental cost" is the key to understanding why geothermal in new construction is such a different financial proposition. Here's how it works:
| Cost Component | Conventional HVAC | Geothermal | Incremental Difference |
|---|---|---|---|
| Indoor equipment (heat pump unit / furnace + AC) | $6,000–$10,000 | $7,500–$12,000 | +$1,500–$2,000 |
| Ground loop (trenching + piping + connections) | — | $8,000–$18,000 | +$8,000–$18,000 |
| Outdoor condenser unit | $2,000–$4,000 | — | −$2,000–$4,000 |
| Gas line to house (if applicable) | $1,500–$5,000 | — | −$1,500–$5,000 |
| Ductwork (slightly larger for geo) | $4,000–$7,000 | $4,500–$7,500 | +$500 |
| Total installed cost | $13,500–$26,000 | $20,000–$37,500 | +$6,500–$18,000 |
| 30% federal tax credit (on geo total) | — | −$6,000–$11,250 | −$6,000–$11,250 |
| Net incremental cost after ITC | — | — | $500–$8,000 |
Read that last line again. After subtracting the conventional HVAC system you'd have bought anyway, plus the 30% federal tax credit, the actual additional cost of going geothermal in new construction can be as low as a few hundred dollars — and rarely exceeds $8,000 even for larger homes.
Compare that to a retrofit, where you're paying the full geothermal system cost on top of the conventional system that's already in the house. The math is completely different.
The Gas Line Savings Most People Miss
If your new home site doesn't already have natural gas service, running a gas line can cost $1,500–$5,000+ depending on distance from the main. Going all-electric with geothermal eliminates this cost entirely. In rural areas where gas isn't available at all, the "incremental" cost of geothermal vs. propane systems drops even further — since you also avoid the cost of a propane tank, pad, and first fill (~$1,000–$2,500).
Planning Timeline: When to Make Each Decision
Timing is everything with new-construction geothermal. Here's when each decision needs to happen:
Pre-Design Phase (6–12 Months Before Breaking Ground)
- Select a geothermal installer — ideally one who has worked with builders before. IGSHPA-accredited installers are listed at igshpa.org.
- Share your home plans with the installer so they can run a Manual J load calculation and size the system.
- Get a soil conductivity test if you're in an area with variable geology. This determines loop length and type. Cost: $1,000–$2,500 for a pilot bore with in-situ thermal conductivity testing.
- Decide on loop type: horizontal (need ½–¾ acre of open land), vertical (works on any lot size), or pond/lake (if available). Your installer will recommend based on lot size, soil conditions, and budget.
Design Phase (3–6 Months Before Breaking Ground)
- Finalize the loop field design — number of bores/trenches, depth, spacing, and routing to the house.
- Coordinate with your builder's site plan — the loop field needs to avoid septic systems, wells, underground utilities, and future additions.
- Design ductwork for geothermal — lower supply temperatures mean slightly larger ducts or more supply registers. Your HVAC designer needs to know this now, not after framing.
- Apply for permits — some states require well-drilling permits for vertical loops, water-use permits for open-loop systems, or specific geothermal installation permits.
Construction Phase
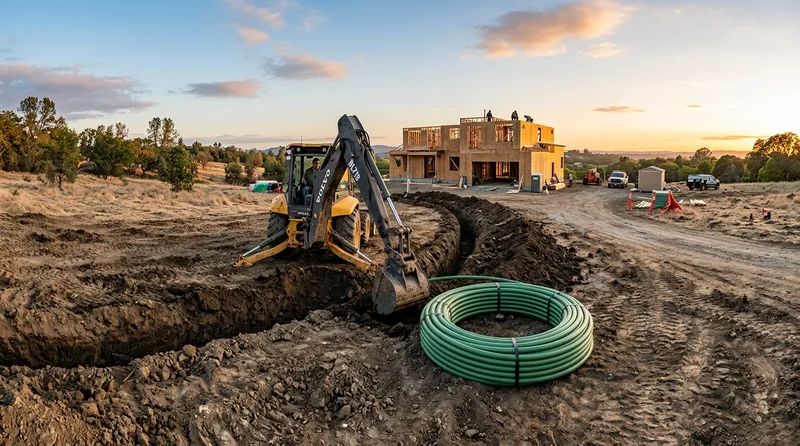
- During site work / excavation: Install horizontal loop trenches. This is the golden window — the equipment is already there and the cost is minimal.
- Before foundation pour: If routing loop piping under the slab or through the foundation wall, those penetrations need to be placed now.
- During rough-in: Connect loop piping to indoor unit location. Pressure-test the loop (hydrostatic, not pneumatic — per ASTM F2164).
- After framing: Install ductwork (designed for geothermal airflow) and the indoor heat pump unit.
- Before landscaping: Final loop testing, purging, and antifreeze charging if needed.
⚠️ The Point of No Return
Once the foundation is poured and the yard is graded, you've lost most of the cost advantage of new construction. If you're even considering geothermal, bring it up with your builder during the design phase — not after framing has started.
Loop Field Planning During Site Work
The ground loop is the heart of a geothermal system, and new construction gives you the rare opportunity to install it at minimal cost. Here's what to know about each loop type in a new-build context:
Horizontal Loops (Best for Larger Lots)
Horizontal loops are buried 4–6 feet deep in trenches. They're the most cost-effective option when you have the land — typically ½ to ¾ acre of open ground. In new construction, the trenching often happens during site grading, which means the additional cost is just the HDPE pipe, fittings, and a few extra hours of excavator time.
New construction advantage: A horizontal loop that might cost $12,000–$18,000 to install in a retrofit (with landscape restoration) typically costs $6,000–$10,000 during new construction — a 40–50% savings.
Sizing rules of thumb (per the DOE and IGSHPA):
- 600–1,000 feet of pipe per ton of capacity (northern climates, heating-dominant)
- 700–1,800 feet per ton (southern climates, cooling-dominant)
- Trenches at least 4 feet deep, typically 6 feet for dual-pipe configurations
- Land area: roughly 2,000–3,500 square feet per ton
Vertical Loops (Best for Smaller Lots)
Vertical loops use boreholes drilled 150–400 feet deep, spaced about 20 feet apart. They're essential for smaller lots where horizontal trenching isn't feasible — which is common in suburban developments.
New construction advantage: While drilling costs are similar regardless of timing (you need specialized equipment either way), the savings come from trenching the header pipes and connections during site work, plus no landscape restoration. Typical savings: 15–25% vs. retrofit.
Sizing rules of thumb:
- 150–200 feet of bore depth per ton (northern climates)
- 250–300 feet per ton (southern climates, per DOE workshop data)
- Typically 1 bore per ton of capacity
- Minimum 20-foot spacing between bores
Slinky Loops (Compromise Option)
Slinky loops use overlapping coils of HDPE pipe laid horizontally in shorter trenches — roughly 4 feet of pipe per 1 foot of trench. They use less land than straight horizontal runs but require more pipe and slightly more pumping energy.
New construction advantage: Great for lots that are too small for full horizontal but where the homeowner wants to avoid drilling costs. Particularly effective in the Southeast and Midwest where soil conditions are favorable.
Pond/Lake Loops (If You're Lucky)
If your building site has a pond or lake meeting minimum requirements (½ acre, 8+ feet deep, within 300 feet of the house), a pond loop is typically the lowest-cost option. Coiled pipe is laid on the pond bottom.
New construction advantage: The supply line trench from house to pond can be dug during site work. If the pond is being created as part of the development (stock ponds, retention ponds), the loop can be placed before the pond fills.
Soil Conductivity Matters More Than You Think
The thermal conductivity of your soil directly determines how much loop you need. According to ASHRAE data:
- Heavy clay at 15% moisture: 0.8–1.1 Btu/h·ft·°F — needs longer loops
- Heavy sand at 15% moisture: 1.6–2.2 Btu/h·ft·°F — moderate loop lengths
- Limestone: 1.4–2.2 Btu/h·ft·°F — good for vertical bores
- Granite: 1.3–2.1 Btu/h·ft·°F — excellent for vertical bores
Your installer should test your specific soil — don't rely on regional averages for a $25,000+ system. A $1,500 conductivity test can save $3,000–$5,000 in right-sized loop design.
Ductwork and Distribution Design
This is where new construction has a massive, often-overlooked advantage over retrofits. Geothermal heat pumps deliver conditioned air differently than furnaces, and ductwork designed for a furnace is not optimal for a heat pump.
The Temperature Difference
- Gas furnace supply air: 120–140°F
- Geothermal heat pump supply air: 90–105°F
Both heat your house to the same thermostat setting. The difference is that geothermal delivers a larger volume of slightly cooler air, while a furnace delivers a smaller volume of hotter air. This means:
- Ducts should be 15–25% larger to handle the higher airflow without noise or velocity problems.
- More supply registers create better air distribution and avoid the "cold blow" complaint — where heat pump air feels cool on your skin even though it's 95°F+ (your body temperature is 98.6°F, so anything below that feels cool as a direct draft).
- Return air paths need to be adequate — starved returns cause airflow problems that hurt efficiency and comfort.
In new construction, designing larger ducts and additional registers costs almost nothing extra — it's just a different specification on the same ductwork bid. In a retrofit, resizing ductwork can cost $3,000–$8,000 and involves tearing into walls and ceilings.
Radiant Floor Integration
Building new also opens the door to radiant floor heating — hydronic tubing embedded in your slab or subfloor. Geothermal heat pumps with a water-to-water configuration are ideal for this because they efficiently produce 100–120°F water. [Radiant floors](/compare/geothermal-vs-radiant-floor/) eliminate the "cold blow" issue entirely and provide the most comfortable heat distribution available.
The cost premium for radiant floors is $3–$6 per square foot during new construction. In a retrofit? $15–$25+ per square foot — if it's even feasible.
Working With Your Builder and HVAC Contractor
The biggest challenge with new-construction geothermal isn't the technology — it's the coordination. You need three parties working together: the builder/general contractor, the geothermal installer, and the HVAC ductwork contractor.
Finding the Right Installer
- IGSHPA accreditation is the industry standard. Look for Accredited Installer or Certified GeoExchange Designer credentials at igshpa.org.
- Ask for new-construction references specifically. An installer who only does retrofits may not know how to coordinate with a builder's construction schedule.
- Get the installer involved early. Before the design is finalized — not after the building permit is issued.
Builder Buy-In
Some production builders resist geothermal because it requires coordination they're not used to. Here's how to get them on board:
- Frame it as an upgrade, not a complication. The builder's scope barely changes — they just need to allow access for loop installation during site work and coordinate a few pipe penetrations.
- Show them the timeline. Loop installation typically takes 1–3 days and happens during early site work — before it can interfere with the building schedule.
- Provide written specifications. Your geothermal installer should provide the builder with a one-page specification sheet: where the loop penetrates the foundation, what clearances they need, and when they need access.
The Critical Coordination Points
- Site work phase: Loop field installation (horizontal trenching or vertical drilling)
- Foundation phase: Pipe penetration sleeves through foundation wall or under slab
- Rough-in phase: Indoor piping connections and ductwork installation
- Pre-drywall: Pressure test of entire loop system
- Final phase: Equipment startup, flow balancing, and commissioning
Real Cost Examples: New Build vs. Retrofit
Let's compare two identical houses — same square footage, same climate zone — one built new with geothermal, and one retrofitted five years later:
Example 1: 2,400 sq ft Home in Climate Zone 5 (Midwest)
| Category | New Construction | Retrofit (5 Years Later) |
|---|---|---|
| Geothermal system (equipment + install) | $28,000 | $32,000 |
| Loop field (horizontal) | $7,500 | $14,000 |
| Ductwork modifications | $0 (designed for geo) | $3,500 |
| Landscape restoration | $0 | $2,500 |
| Value of removed conventional system | −$12,000 (never purchased) | −$0 (system is "sunk cost") |
| Gross incremental cost | $23,500 | $52,000 |
| 30% federal tax credit | −$10,650 | −$15,600 |
| Net cost | $12,850 | $36,400 |
| Annual energy savings (vs. gas furnace + AC) | $1,400 | $1,400 |
| Simple payback | 9.2 years | 26 years |
Same house. Same system. Same savings. But the new construction homeowner breaks even in under 10 years, while the retrofit customer is looking at 26 years — longer than the equipment will last.
Example 2: 2,000 sq ft Home Replacing Propane (Rural)
| Category | New Construction | Retrofit |
|---|---|---|
| Geothermal system total | $24,000 | $28,500 |
| Loop field (horizontal) | $6,000 | $12,000 |
| Conventional system avoided (propane furnace + AC + tank) | −$11,000 | $0 |
| Gas line / propane infrastructure avoided | −$2,000 | $0 |
| Ductwork / landscape | $0 | $5,000 |
| Gross incremental cost | $17,000 | $45,500 |
| 30% federal tax credit | −$9,000 | −$12,150 |
| Net cost | $8,000 | $33,350 |
| Annual savings (vs. propane at $2.50/gal) | $2,200 | $2,200 |
| Simple payback | 3.6 years | 15.2 years |
In rural propane territory, new-construction geothermal achieves payback in under 4 years. With the 30% federal tax credit and potential USDA REAP grants for agricultural properties (up to 50% of costs), some rural homeowners see payback under 2 years.
Financing and Incentives for New Builds
The Construction Loan Advantage
Here's a financing angle that makes new-construction geothermal even more attractive: the entire geothermal system cost can be rolled into your construction loan and mortgage. This means:
- No separate loan at a higher interest rate
- Spread the cost over 30 years at your mortgage rate (typically 6–7% in 2026)
- Monthly mortgage increase is less than monthly energy savings in most cases — meaning you're cash-flow positive from day one
Example: An additional $12,000 in mortgage at 6.5% over 30 years adds about $76/month to your payment. If the system saves $180/month in energy costs, you're netting $104/month from the moment you move in.
Federal Tax Credit: 30% (Through 2032)
The Residential Clean Energy Credit (IRC §25D) covers 30% of the total installed cost of a geothermal heat pump system — including the ground loop, equipment, and installation labor. This credit applies to new construction and is a dollar-for-dollar tax credit, not a deduction.
- No cap on the credit amount
- Carry forward unused credit to future tax years if your tax liability is lower than the credit
- Scheduled phase-down: 30% through 2032, 26% in 2033, 22% in 2034
State and Utility Incentives
Many states offer additional incentives that stack with the federal credit. Check our state-by-state guides for your specific location. Notable programs for new construction:
- New York: PSEG Long Island $2,400/ton + NY State 25% credit (up to $10,000)
- Massachusetts: Mass Save up to $13,500 rebate + 0% HEAT Loan
- Connecticut: Energize CT rebates + Smart-E 0% loan
- Vermont: GMP-Dandelion partnership for turnkey installation
USDA REAP for Rural Properties
Building on agricultural or rural property? The USDA Rural Energy for America Program (REAP) offers grants covering up to 50% of system costs, which stacks with the 30% federal tax credit for potential 80% coverage. See our state guides for REAP details in your area.
Common Mistakes That Cost Thousands
Mistake 1: Waiting Until After Design to Consider Geothermal
If your home plans are finalized, your HVAC budget is set, and the building permit is issued — you're late. Not too late, but late enough that it'll cost more and require change orders. Bring up geothermal at the design phase, ideally before the builder even prices the HVAC subcontract.
Mistake 2: Undersizing the System to Save Money
Geothermal systems should be sized to handle 100% of your heating and cooling load (with electric backup strips for rare extreme cold events). Undersizing to save $2,000–$3,000 upfront leads to a system that runs continuously during peak demand, shortens equipment life, and doesn't deliver the savings you expected. Always base sizing on a proper Manual J load calculation — not rules of thumb or square footage alone.
Mistake 3: Not Testing Soil Conductivity
Especially important for vertical loops. If your installer assumes average soil conductivity and your site has dry sand or clay, you'll end up with an undersized loop that can't deliver enough heat exchange. A $1,500 in-situ conductivity test is cheap insurance on a $25,000+ system.
Mistake 4: Using Standard Ductwork Design
If your HVAC subcontractor designs the ductwork for a furnace (which many will by default), you'll get ducts that are too small for geothermal airflow. This causes higher velocity, more noise, and the uncomfortable "cold blow" sensation. Make sure the ductwork specification explicitly calls out design for heat pump supply temperatures (90–105°F) and corresponding airflow (400+ CFM per ton).
Mistake 5: Not Documenting the Loop Location
After installation, before the loop field is buried, photograph and GPS-document the exact location of all loops, headers, and connections. Twenty years from now, you (or the next owner) will need to know where everything is for maintenance or property improvements. Have your installer provide an as-built drawing with measurements to permanent landmarks.
Mistake 6: Choosing the Cheapest Installer
Geothermal is not a commodity HVAC install. The loop field design, grouting quality (for vertical bores), pipe fusion technique, and system commissioning all directly affect long-term performance. An IGSHPA-accredited installer with new-construction experience is worth a 10–15% premium over the lowest bidder.
Frequently Asked Questions
The incremental cost — above what you'd pay for a conventional HVAC system — is typically $8,000–$15,000 after the 30% federal tax credit. This varies by region, soil conditions, loop type, and home size. In propane territory, where the avoided fuel infrastructure costs are higher, the incremental cost can drop below $5,000.
Yes, but you lose some of the cost advantages. Vertical drilling can happen anytime (the drilling rig doesn't care about your house), but horizontal trenching after grading and landscaping costs significantly more. The ductwork issue is the bigger concern — if it's already sized for a furnace, you may need to accept smaller ducts and add supplemental registers.
Studies suggest homes with geothermal systems sell for 3–6% more than comparable homes without them, and sell faster. The payback period article covers this in detail. The key selling point: buyers inherit a system with $0 fuel costs and minimal maintenance, with a ground loop that lasts 50+ years.
That's common — and not a dealbreaker. The builder's scope barely changes. The geothermal installer handles the loop field and indoor equipment. The builder just needs to coordinate access during site work and allow pipe penetrations through the foundation. A good geothermal installer will provide written specifications and attend key coordination meetings.
If you have ½ to ¾ acre of open land, horizontal loops are almost always the most cost-effective in new construction — the trenching costs are minimal when excavation equipment is on site. Vertical is better for smaller suburban lots (under ¼ acre of usable ground) or sites with rocky shallow soil. If you have a suitable pond, pond loops are often cheapest of all.
Horizontal loop trenching: 1–2 days. Vertical bore drilling: 2–5 days depending on the number of bores and drilling conditions. Header pipe connections and pressure testing: 1 day. The total window is typically less than a week and happens during the site work phase — well before it could delay the construction schedule.
Yes. Since the geothermal system is part of the home's HVAC, it's included in the construction budget and financed through your construction-to-permanent loan. This is one of the biggest financing advantages of new construction — you pay mortgage rates instead of the higher rates on home improvement loans or HVAC financing.
Absolutely — and new construction is the ideal time to install radiant. A water-to-water geothermal heat pump produces 100–120°F water that's perfect for in-slab hydronic radiant heating. The tubing is laid before the slab pour, adding $3–$6/sq ft. Radiant + geothermal is widely considered the most comfortable and efficient heating combination available.
Several production builders in geothermal-friendly markets now offer geothermal as a standard or optional upgrade. In larger developments, shared bore fields or community loop systems can reduce per-home costs further. Ask your builder — even if it's not on the options list, they may accommodate it as a buyer-supplied upgrade.
This is the honest answer: if natural gas is available and cheap ($0.70–$1.00/therm), the financial payback for geothermal in new construction is longer — typically 12–20+ years. The system still saves money over its lifetime, but it's not the slam-dunk it is in propane, oil, or electric resistance territory. That said, you also avoid ever being subject to gas price increases, and you eliminate the gas line and meter costs. See our geothermal vs. natural gas comparison for detailed analysis.
The Bottom Line
If you're building a new home and you don't at least get a quote for geothermal, you're leaving money on the table. The incremental cost is a fraction of what retrofit customers pay. The payback is faster. The financing is better. The installation is less disruptive. And you get a system that will outlast two or three conventional HVAC replacements.
The window is narrow, though. The time to decide is during the design phase — not after the foundation is poured. Talk to an IGSHPA-accredited installer and your builder early, get the numbers for your specific situation, and make an informed decision.
For state-specific incentives, costs, and installer resources, check our comprehensive state guides — we've covered all 50 states with detailed payback analysis for new construction scenarios.